Oct
2003
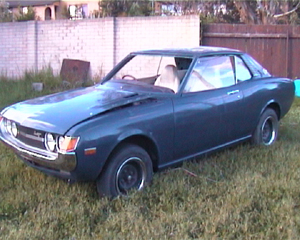
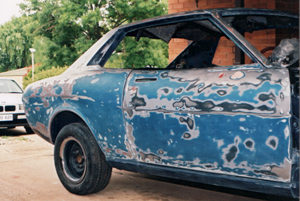
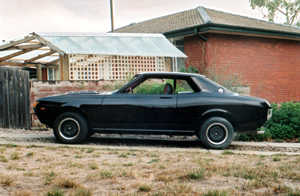
Purchased my little 72 for a meagre sum of $600. Paid the tow man fiddy bucks and had it shipped into it's holding pen (my girlfriend back yard - she's so understanding) while I source an engine. After much deliberating and research decide on the 2TGEU and proceed to try and find one for sale. After much heartache I find at Asian Auto Spares they have a TE71 halfcut ready and waiting. After forking out $1400 plus shipping there is half a car is sitting on the driveway; which the neighbours all find sooo amusing.
Nov
2003
Start removing the interior in preparation of a total strip back and repray. Started removing parts off the halfcut. Progress is stalled as the garage I had originally planned to do the work in is not available so I have to wait for some room to move in and commence work. Started labeling plugs in the halfcut for future reference (hey I know I'm anal but it made such a difference later on).
Jan
2004
Changed plans and moved the halfcut and car to my Dad's garage. Work begins…
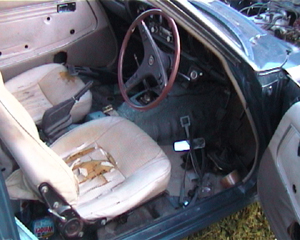
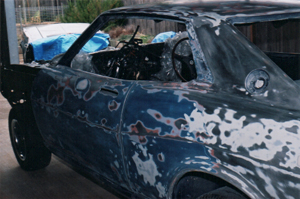
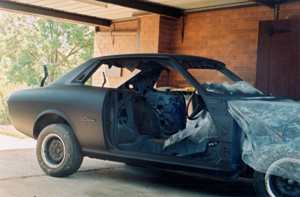
Started stripping out all the headlights, interior, old 2T, etc. (this took only about a day) Stored it all in a couple of boxes in the shed.
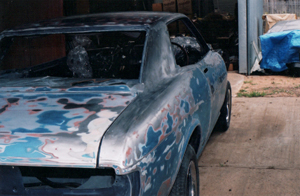
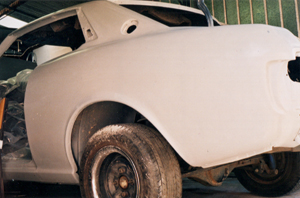
Then came the sanding back of the paint. The original idea was to sand back the entire car back to metal. Well if your going to sand a TA22 it took me over 6 days working roughly 8+ hours a day (if you add that up that's a freakin' long time). If you not worried about the existing bog that may be hidden under your existing paint work then chemical paint stripper is the way to go.
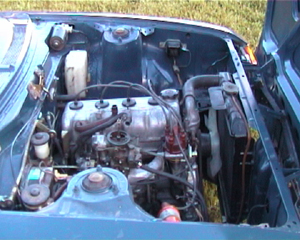
Once the car was completely sanded. I was faced with a problem. I had not received my spray gun… I did however have a cheap gun that came free with the compressor I had bought; so I sprayed up the engine bay and began the engine conversion.
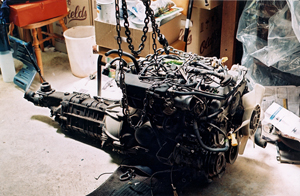
The first process was to strip out the 2TGEU from the halfcut. This was achieved in about a day and I now had a nice (slightly grubby looking) engine sitting on the garage floor. I then detached the gearbox and started measuring up the two engine bays to see if it would fit.
Facts and figures of a 2TGEU engine conversion:
The first thing you will need to do is take the engine mounts off the
2TGEU and replace the mounts with the old ones off your original 2T. Once
you've done this the engine will slot into the TA22 engine bay with no
hassles. I on the other hand did not know this and almost started sobbing when the measurments from the TE71 mounts and the TA22 engine bay didn't match up.
The AFM needs to be mounted into the TA22 - I used the coil and brackets from the TE71 which just required a few holes to be drilled and bolts fitted. A fuel pump will need to be added to back (or engine bay) to supply the EFI. I used a Bosch VL commodore pump picked up at a wreckers for $110. You will then need to change over the fuel hoses to EFI hose (costs between $20-$30 so shop around). You can add a fuel filter before the pump to filter out any nasties that may be luring in your tank. I used a standard plastic filter but you may need something more durable (we shall see what the rego people say). To mount the pump I just crawled in underneath the back diff and there is a support plate attached to the spare wheel well. Next to the plate the two fuel lines poke through the chassis and have a small section of hose. Determine which is your supply line and which is your return line. Disconnect the supply hose and splice in your pump and filter using the EFI hose. I then ran a power wire back up into the cabin and along to the front to the dash. On the wiring loom of the 2TGEU is a relay switch (mine was labeled spare fuel pump) in which you will need to connect your fuel pump power to. This will enable the fuel pump to only be turned on when the key is turned to ignition but not when it is on ACC. Lastly you will need to connect up the fuel filter that is attached to the front of the fuel rail. This then needs to be mounted in the engine bay of the TA22 in the appropriate place.
As I was waiting for the spray gun I spent a lot more time cleaning engine parts and painting the rocket/plenum covers, but if you could probably get away with doing this conversion in about 2-3 days.


One of the biggest problems I had was all the extra wires and connectors. As the TE71 halfcut had aircon there was a crap load more connectors and left over pieces. Keep them if you want (they might come in handy later on). Thanks to Mitch for pointing out a lot of these that I was trying to find a place for. I kept the existing wiring loom of the TA22 as this is so much easier. There were still a few plugs left over on the 2TGEU wiring loom so don't be too worried that you haven't plugged everything back in.
Feb
2004
Learnt a valuable lesson… When you do a 2TGEU conversion; the radiator wont fit back in unless you upgrade to a thermo fan… $225 later I have cooling (with the inclusion of a thermo switch as well). I have also been told that you could fit the original 2T water pump back on and the fan will fit, but I liked the idea of a thermo fan better.
Started on the wiring of the ECU. At first I thought this would be a relatively simple process but when you track a wire from the ECU and it stops at a dead end; then you know your in for some work. If you label all the plugs before you detach them from your halfcut it will save some effort, but the best thing is to use a small battery - stick some wires to it and run the + end into the plug your testing and connect the negative up to a multi metre (you do have one don't you!?!) and testing all the plugs for a current; when you get a reading you've found the wire. Tedious but it works. Don't do what I did and use the car battery; after the first buzzing/frying noise I stopped that quick smart - I really hope the car starts now. So after a while I ended up splitting open the whole loom and discarding all the excess baggage must have saved at least 5kg with that lot.
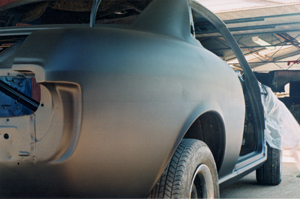
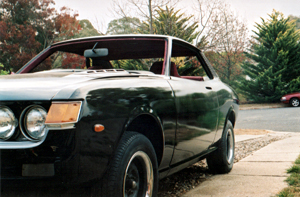
Completed the first undercoat of paint as well. As I had sanded back to metal on most panels this was a very long process. First I used a metal conditioner call Dioxadine (phosphoric acid) which killed all the rust, then added a coat of etch primer. When that was all dry I then sprayed on the grey undercoat. Things to note: If you spray at night, it's cooler but bugs keep landing on the fresh paint and become entombed. Don't operate heavy machinery after spray painting. The smell of the thinners was making me see through time.
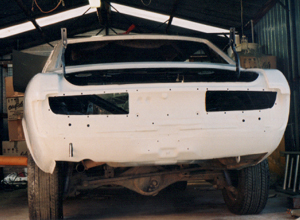
After the Grey primer was dried (about a week) I then sprayed a coat of black undercoat. This is a useful step when painting black topcoats as it will lessen the chance of The grey undercoat showing through the top black layers and spoiling the whole effect. This coat was then left for another week to cure before the top coats were added. Finally the moment of truth the top black and pearl coats. This had to be completed all within the same day as the black and the clear gloss need to be sprayed simultaneously as if left too long in-between coats there is a risk the clear coat will not bond with the black topcoat underneath it.
With this the completed the car was left to dry for a few months while I concentrated on the other parts still needing finishing; the ECU wiring.
Connected the wiring and finding a few loose bit that I hadn't connected up started the engine… After a few initial cranks the fuel line from the filter to the rail burst spraying fuel into the engine bay. So off to the hose repair people and for $30 had a new hose fitted. 2nd attempt… The car would fire but then cut off after 3 seconds a highly frustrating experience. I rechecked all my wiring and found that a wire from the positive battery terminal to the Injector ballast resistor was missing. After replacing this the car started and roared into action. Now that the car was running I only had the interior to do.
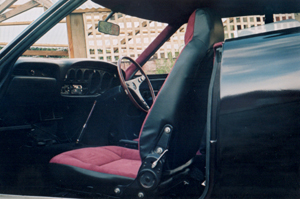
I shopped around for the best price on upholstery fabric and I would recommend if you are going to have your interior done you do the same. The variation on price was quite considerable for the same fabric (up to $30 a metre which when your buying 6.5m worth makes a hell of a difference = $195 saving - see the resources page for some prices and suppliers). Also if you are going to upholster your interior you must use an industrial sewing machine if you want it to last. I found one of the few places in Canberra that will hire you a machine for a week at a reasonable price was a place called Alan's Industrial Machine Repair 62995294. After spending two weeks cutting and sewing the interior was done.


The carpet was next; I bought a super plush carpet from Tru-fit carpets in Dickson, and it was a bit disappointing in the fit. After recommendations from other Celica Club members (thanks Mitch) purchased a carpet from SuperCheap Auto (the carpet is actually supplied from Queensland Moulded Car Carpet if you prefer to go to the source. Nb the price is no cheaper). This Carpet is a great fit and I would highly recommend it for a TA22.
March-April 04 (I started to slow down and take my time)
Once the carpet was in it was time for the rest of the interior to go
in. This took a heck of a long time and lots of stuffing around as things
just never go back in as easily as you took them out (that and I always
seem to be missing two key bolts). With the seats firmly bolted in place
the roof was fitted and stuck in place. The rest of the interior was added,
and the panel work put back in place.
The only thing now is the windscreens, wheels and suspension.
May 04-June 04
While tuning the engine I made a bad mistake. I tighened up the top timing chain tensioner and when I tried to put the locking nut back the whole thing cracked off and fell on the floor. Very not happy.
Windscreens - I've learnt a lot about windscreens and windscreen fitters. Having sourced some new rubbers for the front and back windscreens I had organised to have them fitted by Instant Windscreens (Big mistake!!). Not only had they ordered two front rubbers but the fitter had the audacity to lie to my face that the aftermarket rubbers they supplied me with are not compatable with the chrome trim. Just to be on the safe side I called there head office to confirm this; same answer. Perhaps they were telling the truth I hear you ask... After having the windscreen inspected by Aussie Windscreen, not only did he confirm my suspicions, but also pointed out that the winscreen is most likely going to leak worse than the Titanic. So I ordered some new back windscreen and wait to have them installed .
July 04-August 04
After a big delay on the rubbers (they had to be sent from Japan), the windscreens are in and it's time to take the car to rego...
Watch this space for the final pictures
Special Thanks
A special thanks you goes out to the following people, without their help and support this project would not have been possible.
Thanks to:
My Dad, for the unlimited use of his garage; for providing me with helpful fatherly advice when I was stuck; and most of all lending a hand when mine were too busy, beaten, bruised, bleeding or any combination of.
Phil Eacott, for putting up with all my "Can you get me a price on...?"
Jeremy Marsh, for all the spare parts that saved my bacon.
Chuck Landwehr, for solving many of my (car) problems.
Mitch Sloan, for guidance and letting me copy things of Tweety.
And a very big thankyou to Pam, without her support and understanding I never would have made it...